> For the complete documentation index, see [llms.txt](https://docs.crowdwork.com/llms.txt). Markdown versions of documentation pages are available by appending `.md` to page URLs; this page is available as [Markdown](https://docs.crowdwork.com/for-theatres/conditional-enrollments.md).
# Conditional Enrollments
Require patrons to meet prerequisites before they can purchase a show or class, using tags granted at checkout.
Conditional Enrollments let you require that a patron meet certain conditions before they can purchase a show or class. The most common use is a prerequisite: making sure everyone enrolling in Level 2 has already completed Level 1.
It works through [Tags](/for-theatres/tags.md). An event can **grant** a tag when a patron purchases it, and an event can **require** that a patron already hold certain tags before they're allowed to purchase. Chain those two together and you have a prerequisite.
{% hint style="info" %}
**A quick example.** Level 1 grants the tag **Level 1 Complete**. Level 2 requires the tag **Level 1 Complete**. A student who buys Level 1 automatically becomes eligible for Level 2 — you don't have to track it by hand.
{% endhint %}
## Setting up Enrollment Requirements
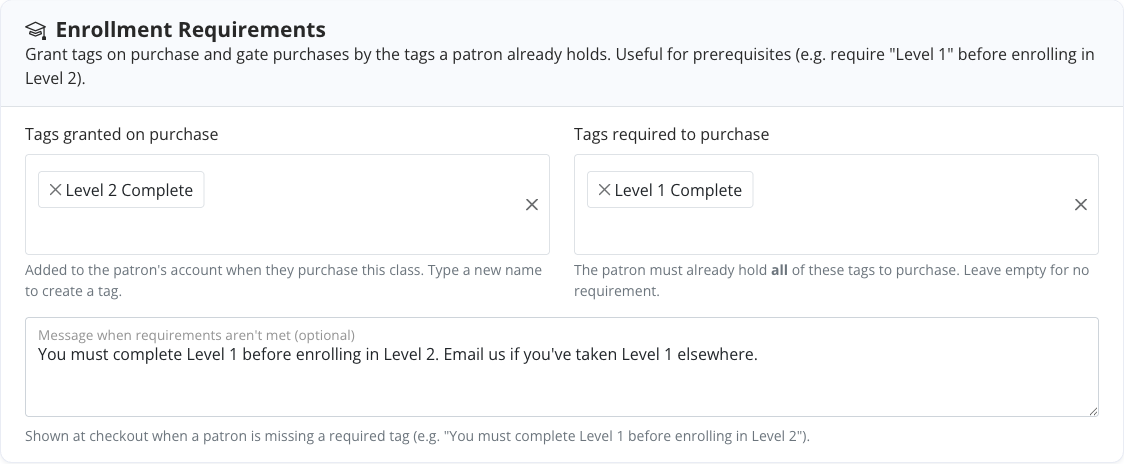
Enrollment Requirements live on the show or class form, in the **Enrollment Requirements** section.
1. Go to [**Shows**](https://crowdwork.com/dashboard/shows) or [**Classes**](https://crowdwork.com/dashboard/classes) in the Dashboard and open the event you want to edit.
2. Scroll to the **Enrollment Requirements** section.
3. Fill in the fields described below, then save.
### Tags granted on purchase
Any tags you choose here are added to the patron's account when they purchase this event. This is what marks a patron as having completed something.
Select an existing tag, or type a new name to create one on the spot.
### Tags required to purchase
The patron must already hold **all** of the tags you list here in order to purchase. If you list two tags, holding just one of them is not enough.
Leave this field empty if the event has no requirements — that's the default, and it's how every existing event behaves.
### Message when requirements aren't met
This optional message is shown at checkout to a patron who is missing a required tag. Use it to tell them what to do next.
A message like *"You must complete Level 1 before enrolling in Level 2. Email us if you've taken Level 1 elsewhere."* is far more useful than the generic fallback, which simply says the patron doesn't meet the enrollment requirements.
{% hint style="success" %}
**Write the message for the patron who is stuck.** They can't complete the purchase, so the message is your only chance to tell them how to become eligible — or who to contact.
{% endhint %}
## Enrollment tags are internal tags
The tags used for Enrollment Requirements are always **internal** tags, including any new ones you create from the event form. Internal tags aren't shown on your public pages, so a prerequisite tag won't appear to patrons browsing your season.
You can see and rename them alongside your other tags on the [**Tags**](https://crowdwork.com/dashboard/tags) page.
## Granting a tag manually
Patrons don't only earn prerequisites through your online checkout. Someone may have taken Level 1 last season, at another theatre, or paid at the box office. You can add the tag to their record directly.
1. Open the patron's record — [**Customers**](https://crowdwork.com/dashboard/customers) for show ticket buyers, [**Students**](https://crowdwork.com/dashboard/students) for class registrants.
2. Click **Edit**.
3. In the **Tags** section, add the tag they should hold.
4. Save. They're now eligible for any event requiring that tag.
A patron's current tags are listed on their profile page, so you can check at a glance what someone is eligible for.
{% hint style="info" %}
**Tags are added to patrons on their record, not on a single order.** Once a patron holds a tag, they hold it for every future purchase.
{% endhint %}
## How patrons are matched
At checkout, CrowdWork looks up the patron by the email address they enter and checks the tags on that record. Capitalization doesn't matter.
Because the match is by email, a patron who checks out with a different address than the one on their existing record won't be recognized as holding their tags. If a patron reports they can't purchase something they should be eligible for, the email address is the first thing to check — and adding the tag to the record they're actually using resolves it immediately.
{% hint style="warning" %}
**Requirements apply to first-time buyers too.** A patron with no prior record with your theatre holds no tags, so they can't purchase an event that requires one until you add the tag to their record. This is what makes a prerequisite a real prerequisite — but it's worth knowing before you add a requirement to a high-volume show.
{% endhint %}
## Granting and requiring happen at online checkout
Tags are granted, and requirements are enforced, when a patron completes a purchase through your public pages.
Admissions you create yourself from the Dashboard — box office sales, comps, and anything you add to an event directly — are handled separately. When you add a patron to an event this way, add any tag they should earn to their record at the same time, using the steps in [Granting a tag manually](#granting-a-tag-manually) above. That keeps the patron eligible for the next event in the sequence.
## Related Tasks
| Task | Guide |
| -------------------------------------- | ----------------------------------------------------------------------- |
| Create and organize tags | [Tags](/for-theatres/tags.md) |
| Create a show or class | [Creating a Show or Class](/for-theatres/creating-a-show-or-class.md) |
| Add admissions from the Dashboard | [Issuing Comps](/for-theatres/issuing-comps.md) |
| Offer a discount to a group of patrons | [Setting Up Discount Codes](/for-theatres/setting-up-discount-codes.md) |